Wild, Wild Horses

It’s my birthday this weekend so you guys get a sad birthday story from my youth. HERE WE GO. YEAH!


“We’re going horseback riding for your birthday, ” my mother announced, out of nowhere.

“What?”

“Horseback riding! Won’t that be fun! You need to invite some friends.”

I didn’t know what to make of it. I was solidly in my pre-teen years at this point and I’d never been into horses. I never lived out the cliche of “I want a pony for my birthday” or anything like that. I’d never even seen a horse in person. (In horse-son?)  It’s not that I was anti-horse… I guess I was horse neutral?

This proposed birthday activity was out of left field and I had no idea why it had been decided upon for said activity.

“Mom, I have no friends to invite. Plus we’re going to be outside, it’s hot, and won’t it be expensive?”

“We’ll figure it out.”

I remember thinking we didn’t have to do this. I tried to get her to reconsider my birthday plans. But it was decided. The horses were booked and after a fight with my mother about her non-refundable deposit, we were on our way!

We drove out of town to a remote, pine tree covered setting. I was meeting up with seven of my closest gal pals!!! …actually, it was one or two girls I was on okay terms with. The rest were girls I invited as a means to try to score social points with them. This was happening, so why not. Maybe I’d get a friend out of this! It’s an opportunity! Be cool, Lauren. Stay positive!

The ride instructor gathered us all around and asked who the birthday girl was. I sheepishly raised my hand and there followed one of the most half-hearted renditions of “Happy Birthday To You” on record. But I ate it up. It was nice to be celebrated. It was My Day.

We mounted our horses, which was no small feat for a short lady such as myself. My horse was white with a dirty white and grey mane. She had grey spots here and there. I can’t recall the horse’s name, so I’ll give you a smattering to pick from. Just choose your favorite! There’s LUCKY, CLOVER, PICNIC, RICKI LAKE, PENCIL LEAD, and HORSE.

Got one? Awesome.

Our ride instructor informed us that we were heading out on a mostly straight trail. A half hour down and a half hour back. No need to really worry about getting the horses to speed up or using the reins. The instructor would lead us out, everyone would fall in line, and we’d be good. If anything, we could click our tongue and give the horse a bit of a nudge in the side with our heels. But they were trained and this would be an easy ride.

“Have fun!”my mother called.

“You’re not coming?”

“Oh, I don’t want to ride a horse.”

Off we went down the dusty trail. The popular girls paired off ahead and behind me, so I was left mid-pack. They chatted and laughed as we set out.

HORSE decided he was on a slow saunter. I mean, I’m sure horses aren’t meant to blaze these trails… but surely a solid mosey would do. Maybe a trot? Maybe? HORSE’s lag quickly became an issue.

“Can’t you hurry up? God, this is going to take forever.”

“Sorry, he’s kind of doing his thing.”

Some of the girls passed me. I panicked and called to the instructor.

“My horse doesn’t seem to want to go.”

“Oh, HORSE is just fine. Just give him a little nudge!”

I squeezed the beast and clicked my tongue, making a sort of clip-clop noise.

Nothing.

“Come on, dude.” I tried again. Nothing.

On the third attempt, HORSE overreacted a bit. With a loud exhale, he picked up and accelerated much, much faster than I expected. I shrieked and hung on to the nub on the front of the saddle for dear life. The instructor at this point had already moved on ahead and was wholly unaware that this gigantic animal had decided to teach me a lesson.

My freak out seemed to do the trick. He slowed down. I was on the verge of tears, but at least we were back to a slow saunter. Whatever you say, boss.

At the halfway point, the instructor held up the group to get us all back together again. I was ready for this trip to be over, so when they asked if we wanted to stop for a minute, I insisted we press on.

We started out again. This time around, though, HORSE’s speed would not be the issue.

“POOP. Lauren’s horse is POOPING.”

It was true. Now, if you’ve ever been around horses, you’ll know that this just sort of happens sometimes. Horses walk around and just go to the bathroom as they stand there. They’re an animal. It’s just something the body does. It would have been fine if it was a one-time thing. But it kept going.

Cries from the girls as we pressed on, laughing about my horse’s gastrointestinal state, complaining about riding behind me. Soon, I was passed by everyone in the party. Just me and my gassy horse, bringing up the rear.

We trudged back to camp. I arrived nearly 20 minutes later.

“What happened, Lauren?” my mom asked.  I burst into tears. Luckily the other girls had left, so I could have my emotional collapse without further damaging my reputation.

The adventure ended with my mother fighting with the owner who wanted to charge us for the extra time spent riding. Once my mom explained that the horse wouldn’t stop pooping, they dropped it. He was probably slow because he didn’t feel well.

They offered for us to come back another day and ride for free, but I elected to skip it. I didn’t want anything to do with horses ever again.
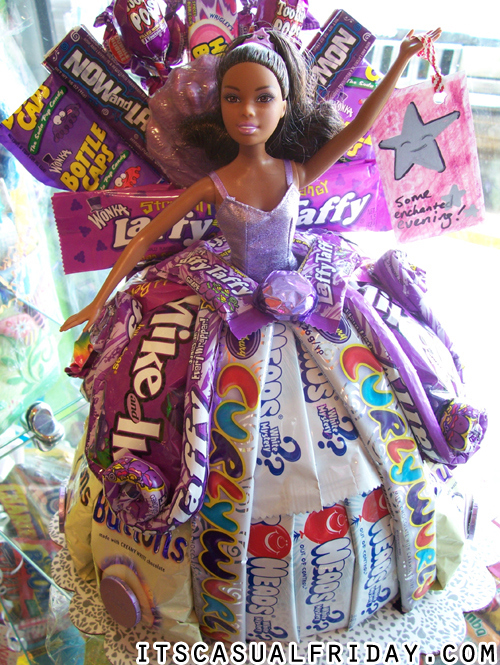
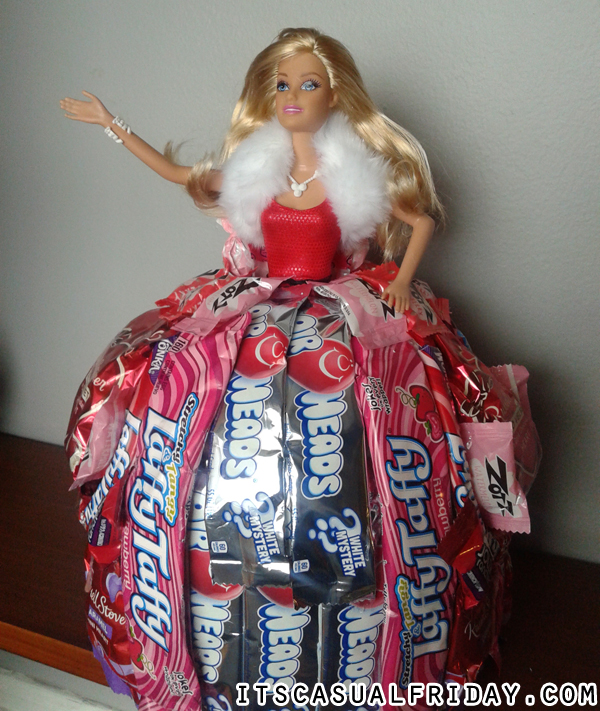
How To Make Your Own Barbie Candy Dress Cake

I used to make candy cakes: Styrofoam cakes with candy hot glued to the outside. The candy simply pulls off the styrofoam and you take off the wrapper and enjoy. My Barbie Candy Cake is by far the most popular thing I’ve posted on Pinterest. It’s a cake with a REAL BARBIE DOLL INSIDE. No weird disembodied torso, OH NO. THE REAL DEAL. Here she is, in all her purple glory:

barbie1watermark

Pretty neat, yes? The advantage of creating these cakes at the candy store was that there was professional equipment at our disposal, like a heated styrofoam cutter, and literally hundreds of sizes and shapes of candy. While you don’t have an entire candy store at the ready, this Barbie candy cake IS possible to make in your own home. And hey – I needed a birthday present, so now is just as good a time as any to make the tutorial.

redbarbiewatermark

I will say that the equipment makes or breaks the “doability” of this project.

Supplies:

  • Hot glue gun
  • Hot glue
  • A hot styrofoam cutter OR serrated knife (a bread knife is cool)
  • A vacuum
  • A drill with spades*

*This is to drill the hole Barbie will go in. If you don’t have a drill you’re going to end up just hacking away a hole in the middle of the styrofoam so Barbie can go inside. Is this easy or safe? Not terribly. The wiser investment might be plunking down a 20 at Michaels for that hot styrofoam cutter.

Shopping List:

  • Anything from the above list you don’t have
  • (2) 8” Cake Dummies (they will be 4″ tall)
  • 1 9” Cake Round (Cardboard Circle)
  • Tissue Paper (to cover the cake round, so maybe in a coordinating color)
  • A chunk of cardstock 4”x8” (we literally used a chunk of a cereal box)
  • A Barbie, with a short skirt or bathing suit outfit
  • A giant pile of candy in your color scheme


Lets discuss the shopping list. The cake dummies are just round styrofoam chunks. Cake decorators use them for practice. You will use them to create the dress. They, and your cake round, can be purchased from any cake decoration store. Support a small business; shop at a local one!

As for the candy, I’d get a color theme in mind. Match it with your Barbie. My Barbie and candy was from around Valentine’s, so that’s why we’re working with a lot of red and pink. You want to make sure you’re picking things that will glue on easily. Anything like a Tootsie Roll isn’t ideal because the hot glue and the wax wrapper aren’t friends. It will just fall off. I love Air Heads candy because they’re a. delicious and b. get good coverage. Laffy Taffy in all it’s wonderful shapes and sizes is also a plus. The purple Barbie has a fan in the back of her dress made of a lollipop with more candy glued to it. My red Barbie just had a few small lollipops in the back. I like the tiny pops because they help fill weird holes and sometimes you can use the sticks for gluing (more on this below).

When thinking of where you can buy the candy, I’d look to local candy stores and bulk food shops first. I made the mistake of trying a Party City first. I went to three before giving up on them. A lesson in taking my own advice. Shop local!

A note: Please keep your kids in mind when picking candy. Allergies are always a concern and sometimes tiny candy is a choking hazard. Be mindful, be safe. Okay, you have a pile of tools! Lets GET TO WORK.

MAKING THE BARBIE CANDY CAKE:

barbiebootywatermark

1. Glue the two cake dummies together using hot glue, one on top of the other. You don’t need to hot glue the thing to death, just enough to create a solid bond, so you have a cylinder that is 8″ tall and 8″ across. While the glue cools…

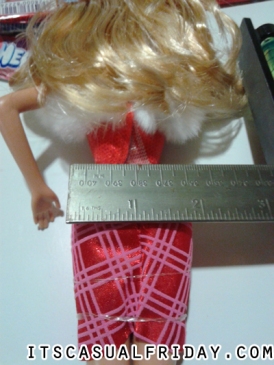
2. Mark center on both the top and the bottom. That’s 4” in. At this point you’ll pick out your wide spade for the drill or if using a foam cutter, measure a 2” circle to be your guide for cutting out the middle so Barbie can fit. Barbie has booty.

3. Oh yeah, secure Barbie’s skirt, if she has one. I used the rubber bands from her packaging.

4. Get your vacuum ready and drill/cut your hole, working from the top and bottom so you meet in the middle. Our spade was 1.5”, so we wiggled it around a little. Styrofoam will fly and stick to everything because of static electricity and science. The vacuum will keep you from going crazy trying to clean up. The hot cutter will be cleaner and might not need the vacuum. If the edge is rough, that’s okay. You’ll cover it with candy.


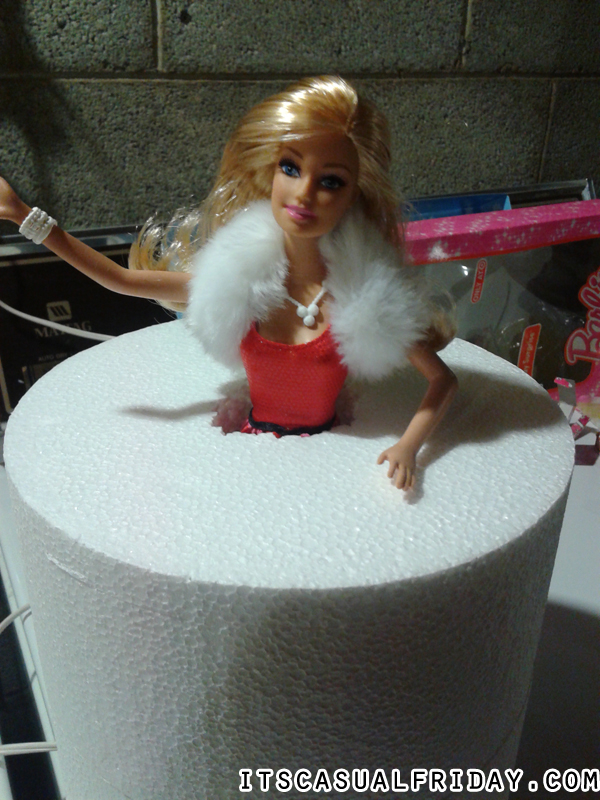
geodresswatermark

Look! Barbie has a very couture minimalist wedding dress now. It’s a statement about the wedding industrial complex. She’s writing her thesis on it.


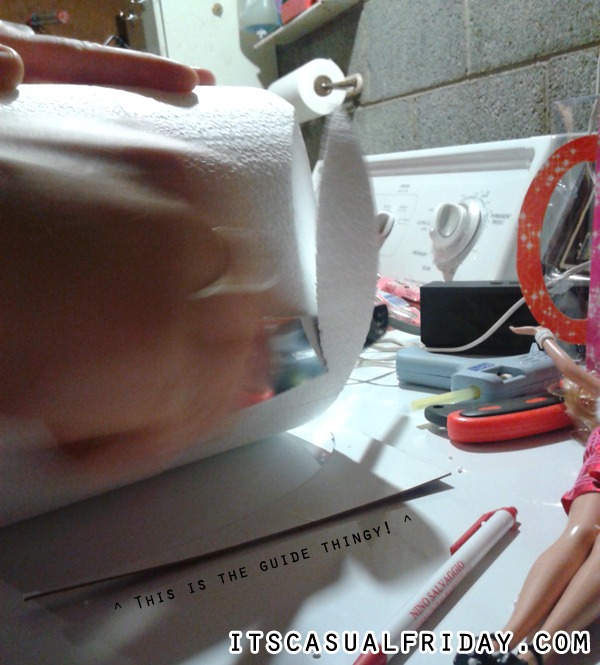
5. Take Barbie out and grab your cardstock. This is going to be a guide for the slope of your dress curve. Draw on the cardboard approximately what you want your curve to look like. Cut on the inside of the curve. This will give you your guide. You can see it below in the action shot of us cutting down the foam.

slicingwatermark

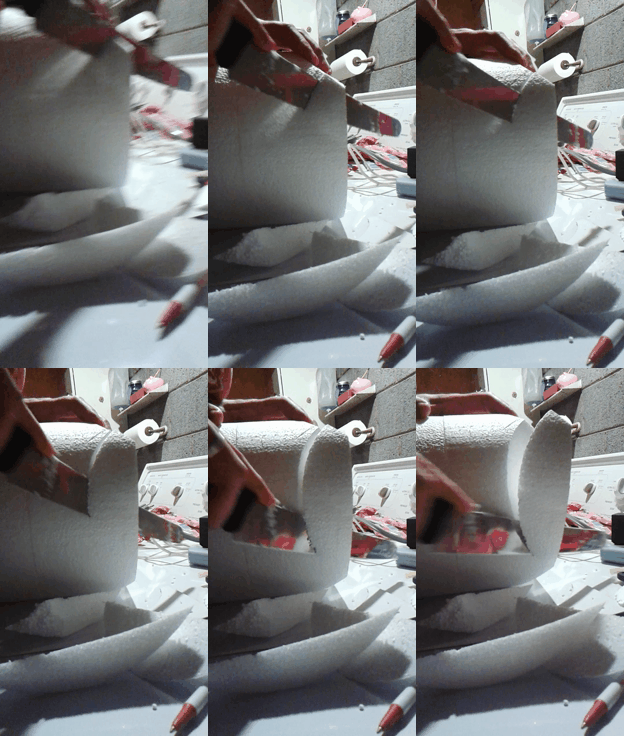
slicinggif

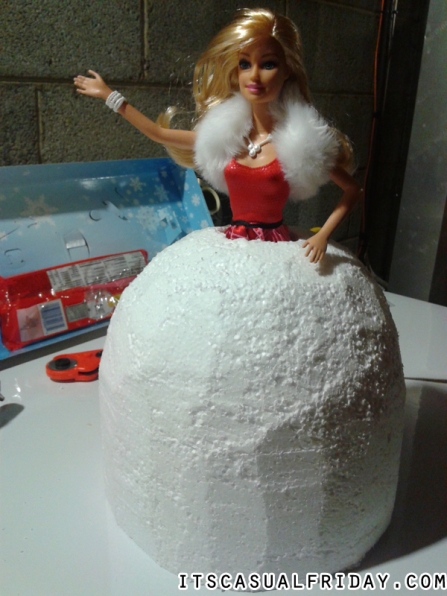
6. Take your bread knife or foam cutting knife and start shaving chunks away. Use the guide and check your progress, by holding it up to your cake. This will help you keep a consistent curve. Otherwise her dress might be weird and lumpy. Again, being exact isn’t 100% necessary because you are covering it with candy. I made a gif of that cutting action for you.

Another note: for the love of all candy, please be careful cutting and drilling and gluing this all together. There are so many exciting ways you can hurt yourself working on this. Take your time and be cautious. I will say it is most likely you’ll burn yourself with the hot glue gun. I’ve done it myself. Careful. Please. Thank you.

7. After cutting away the sides, do a height check. We found that Barbie’s hips were at about 7.5” so we cut a final half inch slice off the bottom.

Ooo dang it’s looking like a dress now!

foamdresswatermark

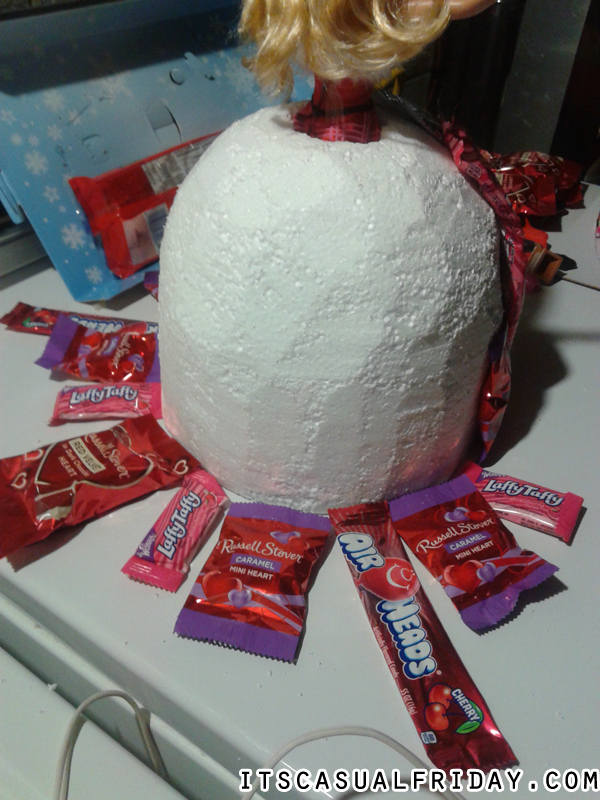
8. Now we assess our candy situation and think about how to design our dress. I completely just make up a dress. I use bigger candy as poofs and try to make layers. The nice thing about the hot glue is if it sucks, you can rip it off and start over. So play around. I like to use the rope Laffy Taffy to define my poofs. The two tone thing (like the purple Barbie) takes more design savvy to pull off, but I think it looks really cool.

candylayoutwatermark

When looking at coverage, I’ll sometimes lay out my candy so I can see how I’m doing. You want to make the front and sides as symmetrical as you can. It looks crummy if it isn’t. The back is the back, so it’s kind of fair game to kind of have it a little messy. But for the front and sides? Yeah. Matchy matchy. It also helps, I think, to establish a pattern.

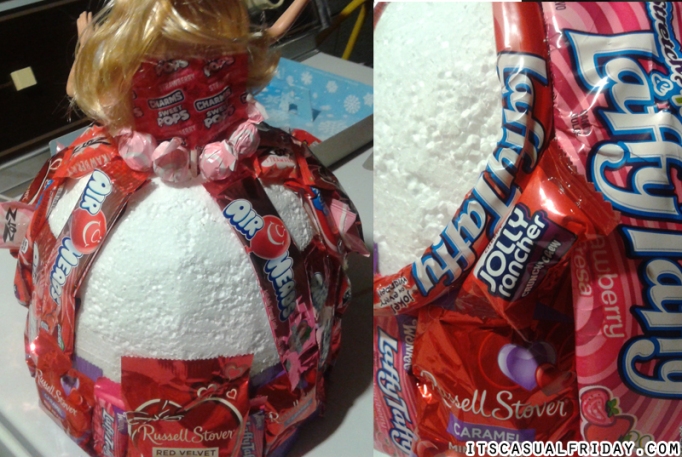
9. Start slapping glue on there. Apply some, not a lot, of glue to your candy. Press it to the foam and hold for maybe 5 seconds.

midglueingwatermark

Sometimes you end up with weird little holes peaking out inbetween your candy. My recommendation is to take some of that tissue paper and dab a little glue on it. Use a lollipop stick to poke it inbetween you candy to cover up the styrofoam. Honestly, you’ll see the gaps and no one else will, but this is a cheap and easy fix. You could also use small candy like the Jolly Rancher. My finished dress also has zots turned on their sides glued in. I think it make it look like little bow/tufts on the side.

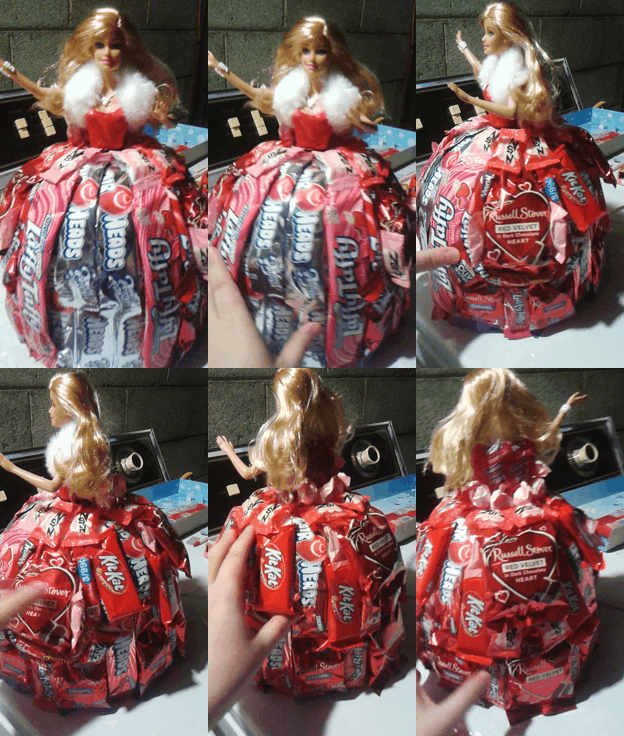
10. Once you’ve filled in all your gaps, your dress is complete! Give it a once over and see if anything is loose. A little extra gluing won’t hurt, especially if it needs to travel somewhere else. Once this is done, take the cake round, hot glue the tissue paper to it, and glue it to the bottom of the dress, tissue paper color side up. Make sure you leave the center 2″ free of glue so Barbie’s shoes don’t get glued down. This is your base.

That’s it! At this point, you have a finished Barbie cake! Ta da! You did it!

dressturngif

Once the candy is devoured, Barbie can be slipped out and played with separately and the cake (if not too beat up) might live to be another dress. Play around, see what kind of color patterns you like and most importantly – HAVE BACKUP CANDY. You might get hungry while you work. It’s part of the design process. Happy crafting!

My 30th birthday is Wednesday. So here’s a story about my favorite birthday cake and friends.

This birthday cake looks like a ham

The year was 2009 and I was turning twenty-five years old. I was officially an adult. I could rent a car by myself, I was at the peak of my physical health, and I had stepped into a new age bracket for marketing demographics. But, most importantly, I was celebrating my last birthday that mattered. Think about it. What lies beyond twenty-five? Twenty-six certainly isn’t important and looming off in the distance is thirty, making you question what you’ve accomplished and what you could have done better and, Jesus, is that a gray hair? Oh god. Twenty-five is the last birthday with any kind of joy or hope attached. Is that jaded? Probably.

Back then I was living in Houston and had a group of friends I commonly celebrated with. The six of us were always together for holidays no matter what they were; Christmas, Independence Day, Columbus Day… Meals were coordinated and duties were handed out. We really operated more like a family in that way, making sure everyone was playing their part in the festivities. Birthdays were no exception.

Cakes were most often handled by my friend Stephanie. She’s an adventurous culinary whiz with an artist’s eye for design. She’s also a bit of an ass sometimes. Her biting sarcasm is well matched with her natural ability for good comedic timing. Her plan for this birthday’s cake would utilize all of these traits. Stephanie was going to create for me a ham cake. That’s right. Ham cake.

Steph had recalled something I mentioned once for the basis of her inspiration. I had mused that I didn’t much care for hams, honey-baked or otherwise, due to having eaten an overabundance of them in my childhood. Every major holiday, or gathering that wasn’t Thanksgiving, contained ham. We didn’t have much money when I was growing up, so we’d always spring for a cheap ham in an attempt to at least make the holiday feel special. There were thick slices of it, usually overdone, and we ate it for days until the ham had been entirely consumed. As an adult I appreciate the gesture, but I still avoid hams to this day. I just can’t stand the taste. Stephanie pondered what she could do with this knowledge and decided to create her most challenging cake to date: a cake that looked like a ham. It was a chance to force me to consume the visage of a food I despised, knowing I was sure to enjoy it. How could she pass that up?

She set to work a couple weeks beforehand, sketching out a detailed schematic of the ham cake, plotting shape and layers – her plan of attack. But she scrapped the whole thing when it was time to create the cake. In her words, “Just as Michelangelo saw an angel in the block of marble and used his chisel to free it, I saw a ham in the pile of cake and used a bread knife.”

Stephanie started with a half sheet of red velvet cake, so deeply crimson from food coloring, you might mistake it for a dark brown at first glance. The half sheet was baked the night before my birthday so it could properly cool. To ensure you have solid cake construction, and for ease of applying frosting, it really is best to work with cake at room temperature. Now, I’ve made plenty of cakes where as soon as it’s baked, you pop it out of the pans, slap some frosting on it, and ta-da! You have cake. But the top layer might slide a little. Or you might have it crack in the middle. Stephanie couldn’t risk any of this happening to my cake. Process is critical for a cake when you’re focusing on presentation.

The next day, cake properly cooled, Stephanie started on the construction. She took the half sheet and cut it up into sections. She then started on a boiled milk frosting, also known as a butter roux. She had done a little research and discovered that this was the traditional frosting for red velvet cakes. It’s a bit different than the cream cheese frosting we all know to accompany red velvet cakes these days. As the names for it would imply, the ingredients for the butter roux are butter, flour, and sugar. It creates a bright white frosting that might seem like buttercream from afar but handles itself much better from a culinary stance. Using the frosting, she stacked the layers of cake, one on top of the other, frosting in between, until she had a magnificent pile of cake. Then the carving commenced. She shaved down the sides with her butter knife, adding some angles and shapeliness to the cake, no longer just a pile at this point.

The next step was to apply the crumb coat of frosting. This coats the cake to trap any loose floating pieces or crumbs. When you trap them, you allow the frosting that goes on over it to glide onto the surface crumb-free, so the cake doesn’t show through and frosting appears smooth instead of lumpy. Also, you get more frosting this way. Bonus! The cake then sat in her fridge for thirty minutes to allow the coating to firm up.

The real artistry came out with the final layers of frosting. Stephanie mixed up several colors of frosting for the cake. First, a base of that brownish pink color that all hams have, followed by a darker brown over that to look like a deep glaze. She took a hot knife and smoothed out the frosting, followed by using unflavored dental floss to create a crosshatch pattern in the frosting over the “ham”. The final touch was to take some black frosting and pipe little dots in the crosshatch. They looked like perfect little cloves pressed into the ham. All said and done, the process took about eight hours, start to finish.

This is inside the ham cake

When she unveiled the cake to us at the party, we all gasped. It looked like the real deal! We were in awe. The coloring was perfect. The details of the crosshatch and the frosting cloves gave the cake an authenticity that would have made it a splendid stand-in for some Norman Rockwell painting. She even found a bit of broccoli to stick on the side as a faux garnish. Ham cake was truly an epic creation.

I was offered the knife to cut the first slice, but I hesitated. It was pristine. I hated the idea of disturbing that perfection. But, unlike Michelangelo’s angel, we weren’t meant to oggle ham cake’s beauty. We were meant to eat it. I sliced off the side to reveal the red cake underneath, in stark contrast to the abundance of white frosting inside. It almost looked marbled, like beef or some other meaty cousin to the ham it aimed to imitate.

As I bit into the cake, I realized it was probably the best cake I’d ever had. The cake itself was flavorful; a perfect blend of sweet and chocolate, and dense but not crumbly. The frosting was delicious. But on top of all of that, the cake had done something really wonderful. It had replaced what was a crappy childhood memory into something that made me happy. It was a deeply meaningful gesture, wrapped in a slightly snarky package that poked at my picky eating. I thanked Stephanie. It was truly a great gift.

Later that year, our friend Matt would request that his birthday cake from Stephanie be a cake ham – a pile of ham slices and mashed potatoes shaped to look like a cake. She did it, and apparently they thought it was delicious. I wasn’t available to eat a slice that day, though, as I was out of town with prior commitments.

You can see more details on Ham Cake’s construction at my friends’ blog 28 oz Wine Glass. There’s also a post about our Cake Ham adventure as well.